openHAB Presence Simulation Google Calendar Scheduler
Today’s Smart Home Training post deals with the openHAB presence simulation in your Smart Home. It’s time to use the Google Calendar Scheduler binding. It offers you automatic recordings. You specify which items you want recorded using a specific group. The automatic recording may be used to run a presence simulation later on. The presence simulation can be activated with a central switch and the recording will be played back. In turn, you can automatically activate this switch via presence recognition. If you are using your own calendar for recording apart from your time-controlled switching, you really don’t have to worry about anything anymore. Simply great!
openHAB Presence Simulation – Install Google Calendar API
First, you have to create a project in the Google APIs. For this, log into the Google Developer Seite.
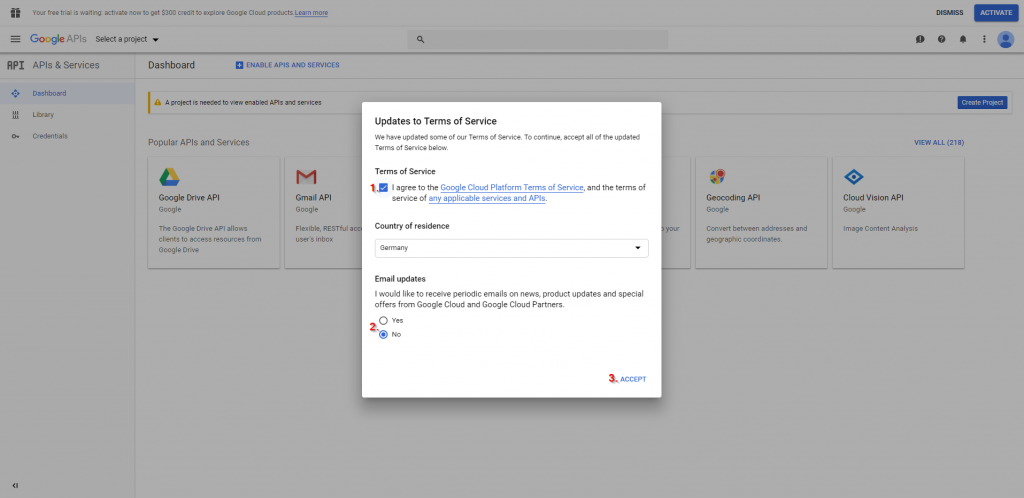
The first time you might get the following window to update the terms of service. Mark the checkbox (1) choose an Email option (2) and accept (3).
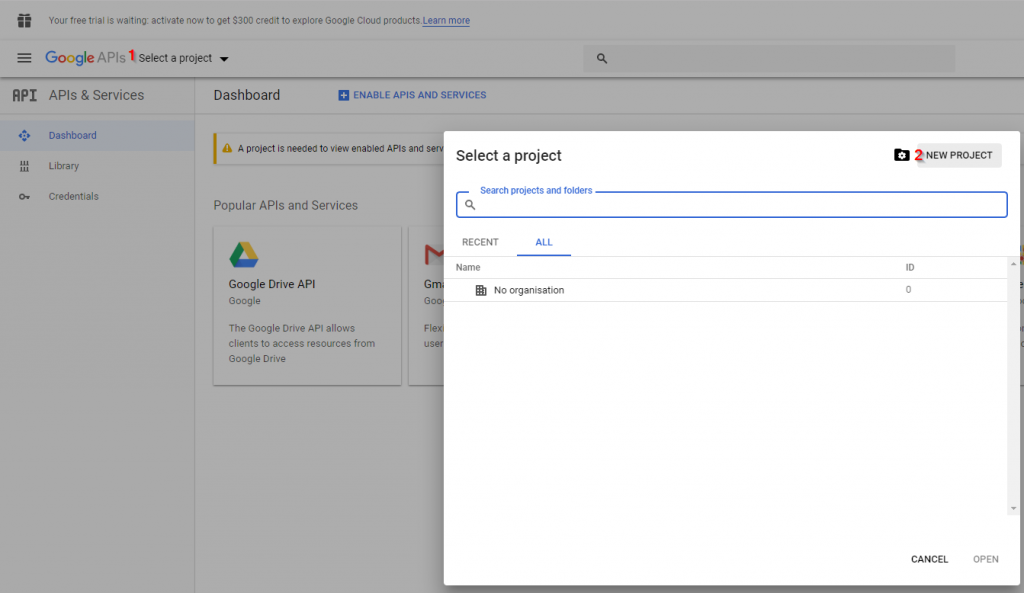
Choose Select a project (1) and in the next window NEW PROJECT (2).
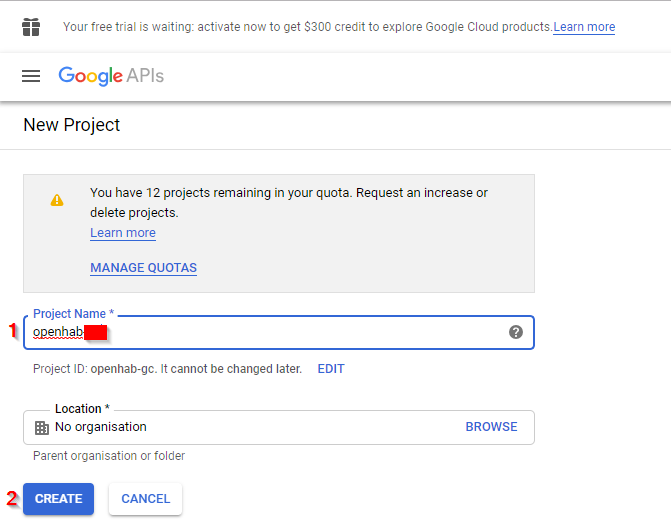
Enter a name for the projekt (1) and click create (2).
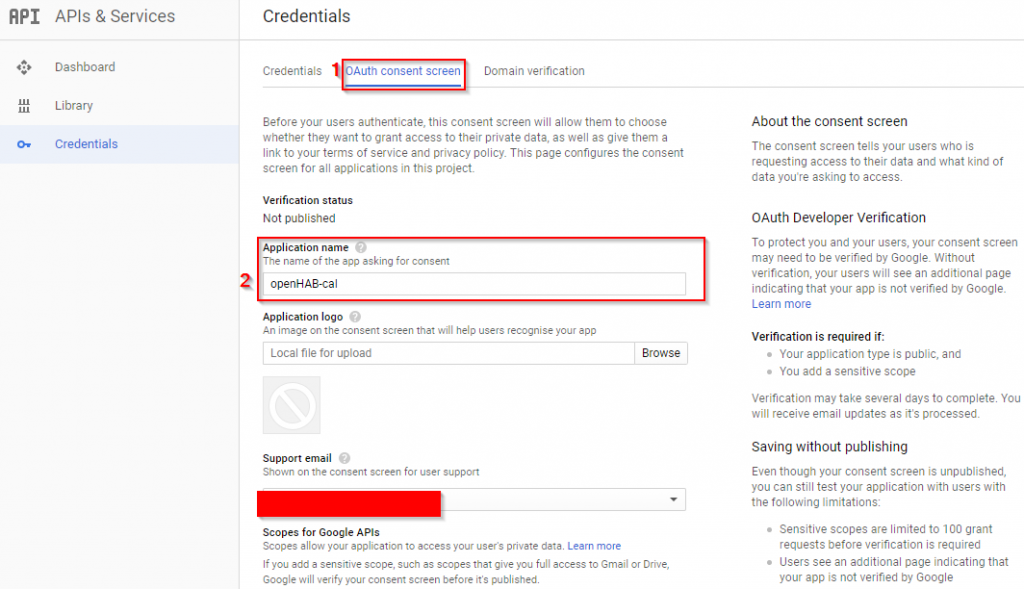
Now you need to consent. Choose OAuth-consent screen (1). Enter a a product name (2), scroll down and save .
Now click on credentials (1), Create credentials (2) and Choose OAuth (3)
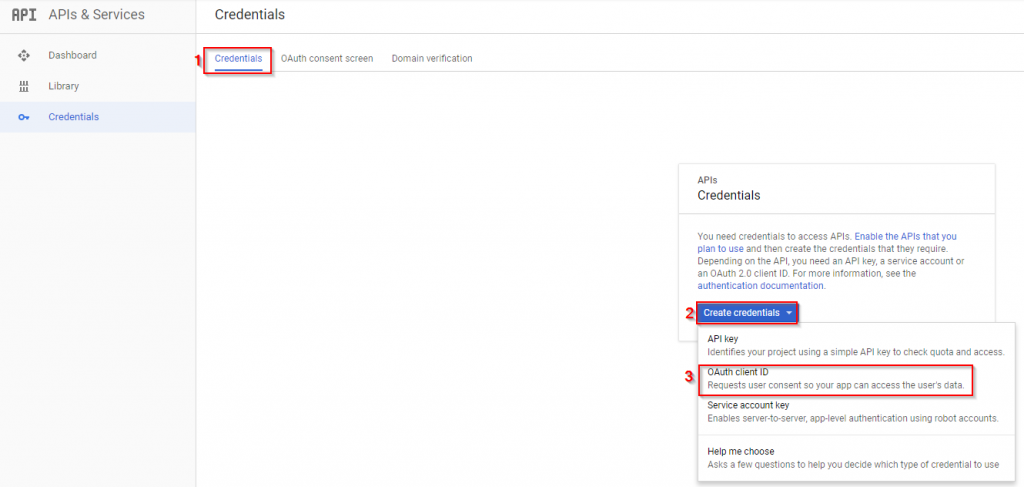
In the folder login credentials click login details to create your login. Choose the entry OAuth-Client-ID.
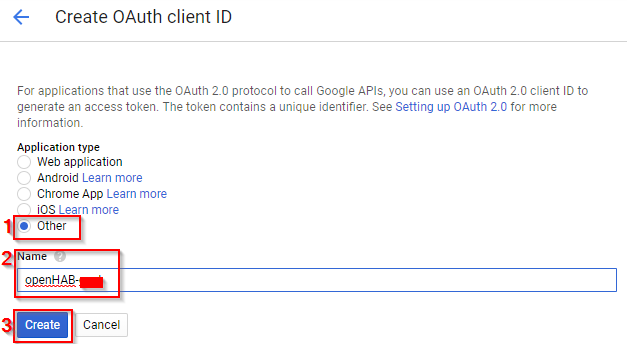
For the ClientID choose others (1), enter a name (2) and click create (3).
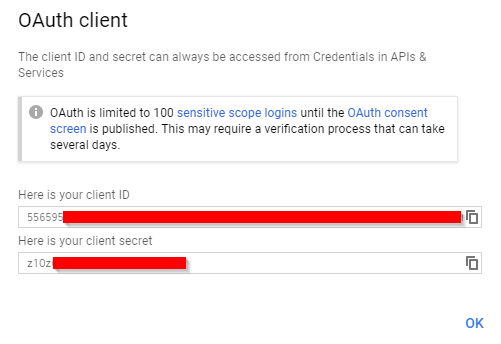
You will now receive the client-ID and the client key. Copy both into a text document and save it.
Got to the API Library
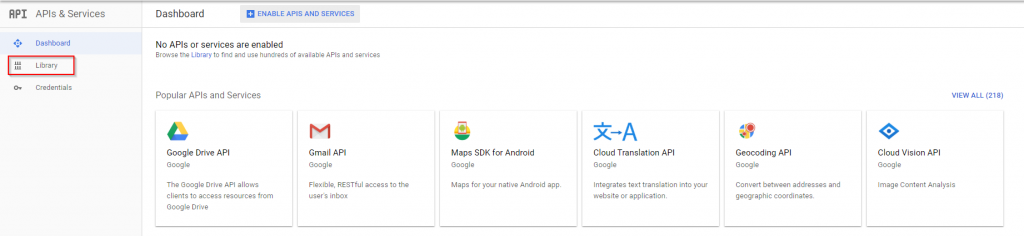
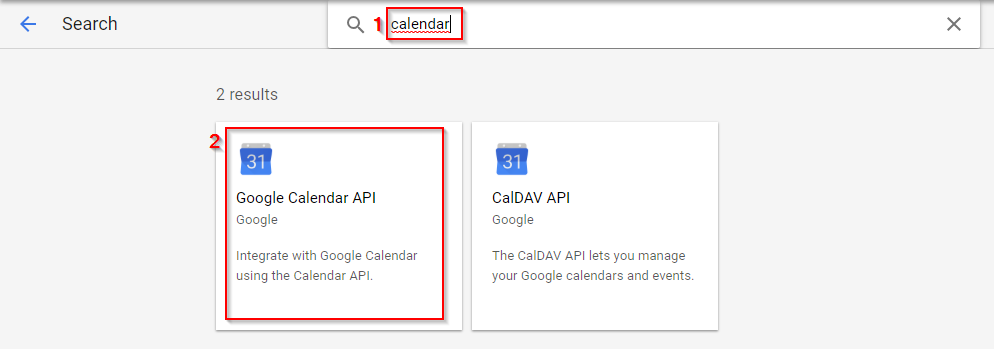
Search for calendar (1) and open the Google Calendar API (2).
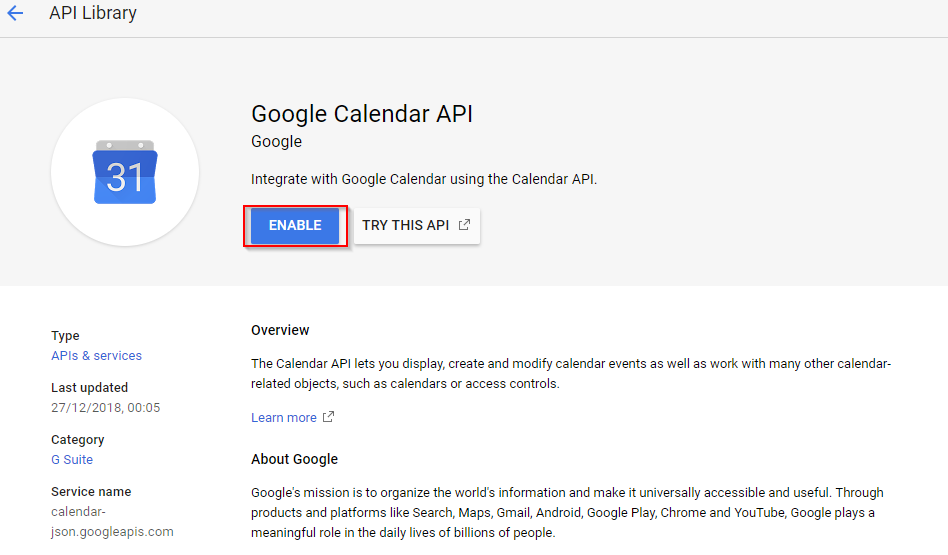
Finally, enable the calendar API in the library.
openHAB Presence Simulation – Create a exclusive Google Calendar
You will need to create a Calendar in your Google Calendar that will be used exclusive for the purpose of presence simulation. I will not describe how to do this, because this a straight forward and there are different resources how to set up a calendar. You might use the following video as a guide.
openHAB Presence Simulation – Install Google Calendar Scheduler Binding
Prerequisite for further implementation is the Installation of openHAB 2. After the installation call up the Paper UI. If your do not know basic stuff about openHAB 2, I recommend enrolling in my openHAB Smarthome Training. If you already familiar with openHAB 2, go on.
http://<openHAB_IP>:8080/paperui/index.html
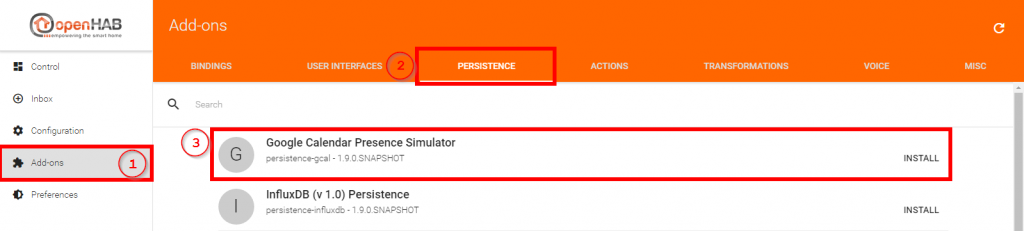
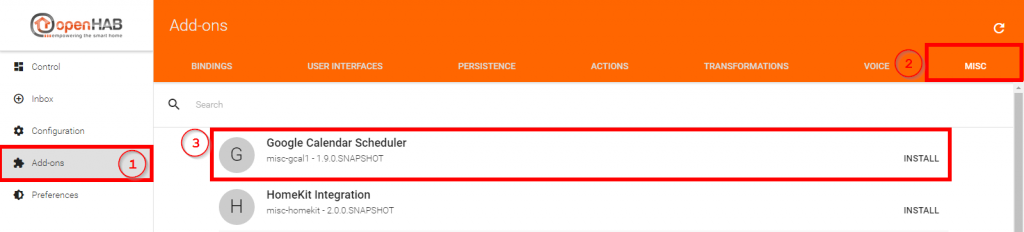
Choose addons (1), persistence (2) and click install for the Google Calendar Presence Simulator (3).
Now choose Misc (2) and install the Google Calendar Scheduler (3).
Open VS Code now. If you don’t have any idea of how to use it, read the post openHAB 2 VS Code.
openHAB Presence Simulation – Configure Google Calendar Scheduler Binding
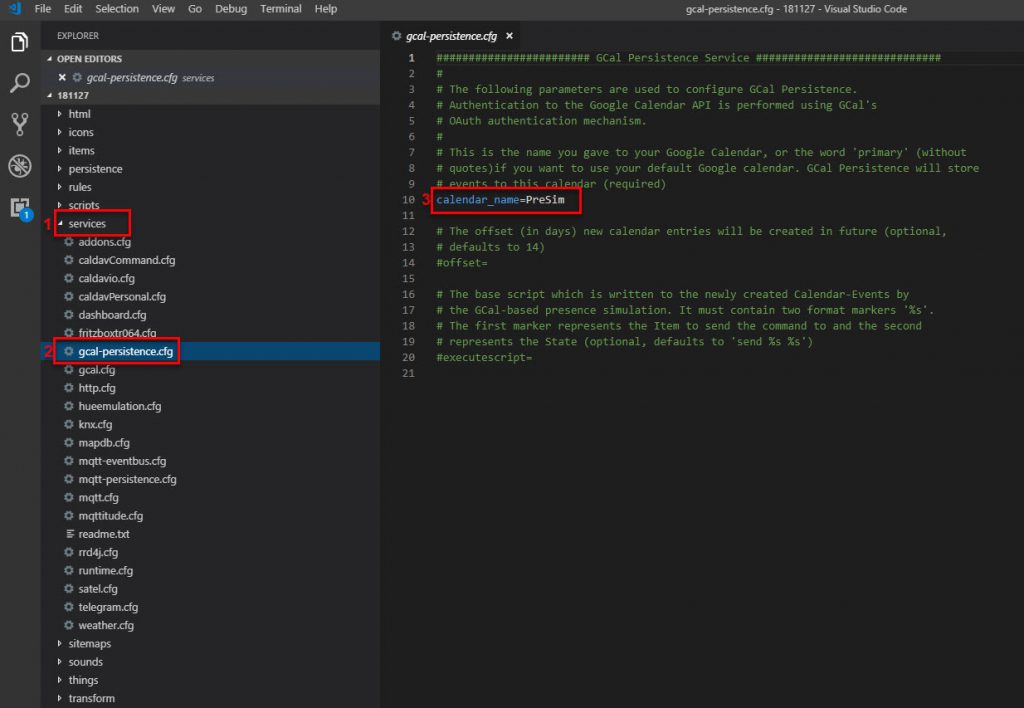
Open the folder services (1). Following that, open gcal-persistence.cfg (3). Under calendar_name enter the calendar for the recording. This is your calendar you have created using Google Calendar WebApp. Everything else is optional. The item activities in the group are saved with a delay of 14 days. It means that you need to have the binding running actively for 14 days before the presence simulation kicks in for the first time. You can change this via Offset.
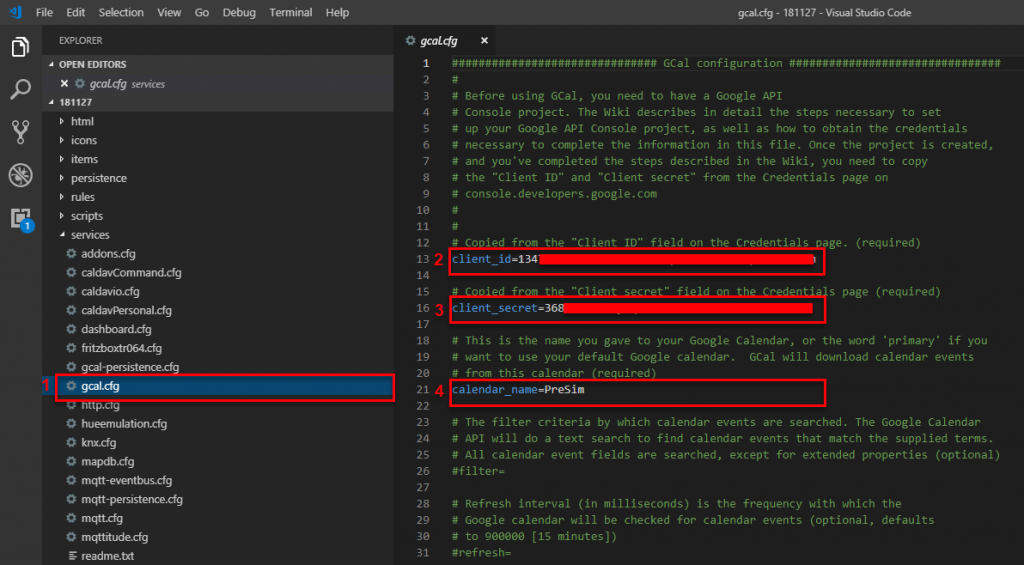
Now open gcal.cfg (1) and enter the copied client-ID (2) at client_id and the client key at client_secret (3). Furthermore, enter the calendar at calender_name (4).
If not already created create a file in the persistence folder that is called gcal.persist (1) in the folder persistence. Now create a simple strategy for your Items that shall be persisted for presence simulation (2).
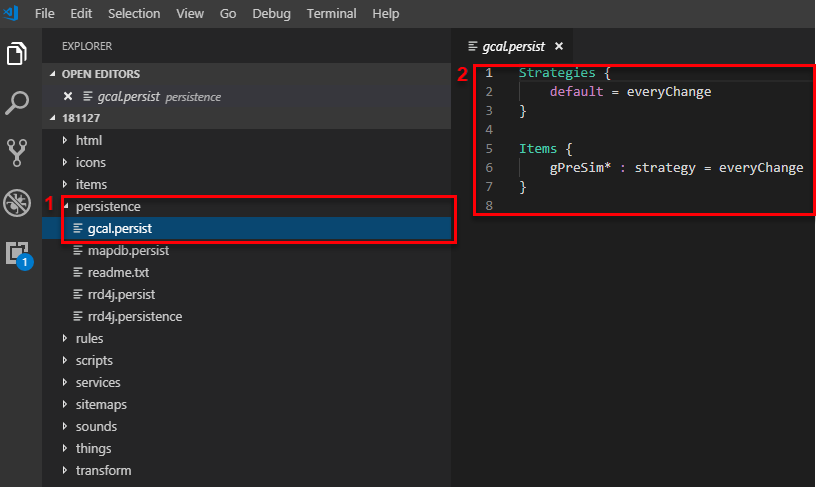
You may also simply copy the following coding. I have named the group gPreSim. The rule defines that every change of item from the group gPreSim will be entered into the calendar.
Strategies {
    default = everyChange
}

Items {
    gPreSim* : strategy = everyChange
}
Now restart openHAB 2. Wait until openHAB 2 is up and running and then check the installation folder for openhab.log. Another way is to call your host/ip followed by port 9001 (e.g. openhabianpi:9001) to open the log viewer if you are using a Raspberry Pi and openHABian. If your installation was successful, you should find the following entries:
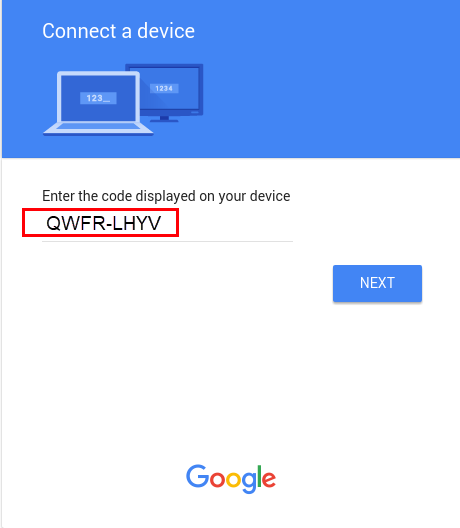
[INFO ] [g.internal.GCalEventDownloader] -#####################################################################################
[INFO ] [g.internal.GCalEventDownloader] - # Google-Integration: U S E R   I N T E R A C T I O N   R E Q U I R E D !!
[INFO ] [g.internal.GCalEventDownloader] - # 1. Open URL 'https://www.google.com/device'
[INFO ] [g.internal.GCalEventDownloader] - # 2. Type provided code QWFR-LHYV
[INFO ] [g.internal.GCalEventDownloader] - # 3. Grant openHAB access to your Google calendar
[INFO ] [g.internal.GCalEventDownloader] - # 4. openHAB will automatically detect the permissions and complete the authentication process
[INFO ] [g.internal.GCalEventDownloader] - # NOTE: You will only have 1800 mins before openHAB gives up waiting for the access!!!
[INFO ] [g.internal.GCalEventDownloader] -###################################################################################
Follow the instructions. In addition, open this internet site https://www.google.com/device and enter the code from the line with # 2. in the next screen.
In the next steps you have to allow openHAB 2 to connect to your calendar. Simply click trough the next steps and you are done.
openHAB 2 Presence Simulation – Google Calendar Scheduler Item Configuration
The configuration of the items for the recording is really simple now. You simply create a group item in your items file.
Group gPreSim
Assign the items you want to use for the recording to the group.
Switch GF_Bath "Bath Ground Floor"   <light> (gPreSim) { knx="5/1/41" }
Color  GF_LivingRoom "Living Room"   <light> (gPreSim) { channel="hue:0210:001234567890:2:color" }
Open Google Calendar in your browser to check. Use your UI to switch one of the items you have added to the group on and off. When I do this, the switching automatically appears in the calendar after 10 – 20 seconds. Don’t leave the calendar just yet.
If this worked, define another item to activate the presence simulation. By default, this is defined as follows. The item must be named PresenceSimulation.
Switch PresenceSimulation "Presence Simulation"
Integrate the item into your sitemap and switch the simulation on. What you might do now for testing is open the calendar again and change the calendar items you have just entered (on/off) to the current day and current time + 2 minutes.
How do you handle your presence simulation? Let us know and leave a comment. If you like the post, please share.
